Saturday, 13 September 2014

Natural Remedies for Runny Nose & Cough: Cut Raw Onions & Double-Boiled Asian Pear

Recently, I keep hearing of my friends' little ones falling sick and so I thought I'd share a natural remedy which I'd learnt from one of the mummies from the "Healthy Food for my Baby" Facebook group. During CNY, my boy was down with a very strong virus attack. His stuffy & runny nose couldn't stop dripping & he was coughing quite badly too. After 2 visits to his paediatrician & almost completing his course of medication, he didn't show any signs of recovering. 

I then decided to try out some natural remedies & to my relief, they worked! After he had fallen asleep, I cut some raw purple onions & placed them near to him. Believe it or not, he could breathe much better that very night! I continued the treatment the next day during his nap again. Word of caution though: the strong pungent onion fumes will difuse throughout the entire room : / My hubby hated it but tolerated for the sake of our boy. Thank you, my dearie ;*


With the positive results from the onions, I was also encouraged to try a new food therapy for him - double-boiled Asian pear, which actually helps to nourish the lungs.

Ingredients:

1 Asian pear, sliced (was advised by my mum subsequently to peel off the skin).

Directions:

1. Place the sliced pear into a ceramic pot. Put the ceramic pot into a bigger pot of water to double-boil for 2 hours.

2. Feed some pear as well as some of the pear essence that is secreted during the double-boiling.


BB really started getting better & recovered in no time. It even helped to ease the process of feeding medicine to him. He can accept the taste of paracetamol but not for the others & will struggle & keep his mouth shut whenever we try to feed them to him. As a last resort, I added some of the pear essence into his medicine & he drank them up without any resistance. The sweetness probably made it more palatable ~.^

I've since shared this with many of my mummy friends & some of them have remarked to me that it's truly indeed effective. In fact, it has become one of our favourite homemade dessert. Given Singapore's hot weather all year round, I think it helps to cool our bodies down too. Now, I'll prepare it for supper almost fortnightly, with an added Chinese almonds for our "adult" version.

Thursday, 11 September 2014

Sugarless Banana Muffins & Banana Blueberries Muffins

I wanted to bake something for BB on his 1st birthday party as I didn't want him to stare enviously at everyone eating the birthday cake & ironically none for him, the birthday boy. After some Googling, I set my mind on sugar-less banana muffins.

A couple of days before the BIG day, I did a trial run but wasn't too pleased with the appearance as well as the texture of the muffins. 


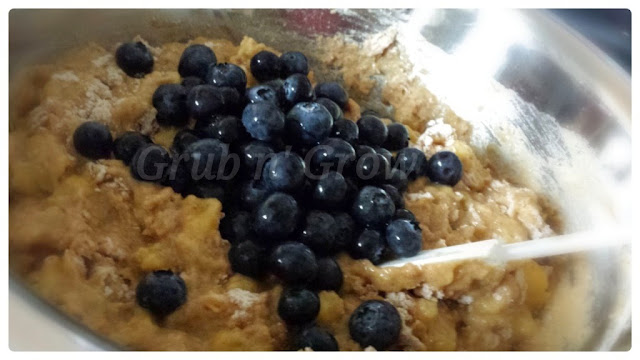
I did some research to improvise & taa-dah! Softer & more moist muffins v(~.^)v As it was the season for the lovely blueberries, I bought some & added them in too.

Ingredients (makes 12 big & 4 small muffins):

8 large ripe bananas
1 cup of organic blueberries
2 eggs
2/3 cup of organic virgin coconut oil (VCO)
2 tsps of pure vanilla extract
3 cups of organic wholemeal flour
2 tsps of cinnamon 
2 tsps of baking powder
2 tsps of baking soda


Directions:

1. Preheat oven to 170°C.

2. Mash the bananas & mix with the other wet ingredients (excluding blueberries) till the mixture is mostly smooth & only slightly chunky.


3. In another bowl, sieve (I added this step to get a fluffier texture) & mix all the dry ingredients.


4. Gently mix the dry ingredients into the wet ingredients till you only see a bit of flour. Then, fold in the blueberries until no more flour can be seen (do not over mix as it would result in denser muffins).


5. Fill each muffin liner till almost full then bake for 20 minutes (about 10 minutes for the small ones). Cool completely before keeping in an airtight container.

The feedbacks from guests were very positive ones. But, more importantly, the birthday boy loves his mini ones & finished all 4 of them.


BB's Puffs

I've tried baking my very own baby puffs (adapted from an original recipe) for BB when he was 9mo. However, I wasn't quite satisfied with the texture eventhough he loved munching on them.

Ingredients (1st Attempt):

2 tbsp of Virgin Coconut Oil (VCO)
2 egg yolks
1/2 cup of breastmilk (may be replaced with either formula or water)
1 tsp pure vanilla extract
1 tsp baking powder
1.5 cups of blended organic rolled oats

Directions:

1. Mix all ingredients by adding enough breastmilk to form a dough. 
(Note: add more oats if you have added too much liquid)

2. Load the dough into a whipped cream dispenser (from Daiso). Pipe out either 0.5cm or 5cm (easier for his little hands to hold) length segment of dough & cut off with the back of a small knife. You won't need to worry about the segments sticking to each other for now as they'll separate easily by shaking the tray after baking.

3. Bake at 170°C for between 7 to 10 minutes.

4. Allow them to cool completely before transferring to an airtight container to be stored in the fridge.


My hubby was recovering from a flu & had knocked off early from work yesterday so I decided to give it a second try. The changes made are in bold & italics for easy reference.

Ingredients (2nd Attempt):

2 tbsp of Extra Virgin Coconut Oil (EVCO)
2 egg yolks
1/2 cup of freshly squeezed orange juice from 2 medium-sized oranges
1 tsp pure vanilla extract
1 tsp baking powder
1.5 cups of organic unbleached flour


Directions:

1. Mix the wet ingredients together, except the juice.


2. Sieve in the flour.


3. Mix all ingredients by adding enough juice to form a dough. 
(Note: add more flour if you added too much liquid)


4. Load the dough into a whipped cream dispenser (from Diaso). Pipe out a 0.5cm long segment of dough at a time & cut off with the back of a small knife. You won't need to worry about them sticking to each other for now as they'll separate easily by shaking the tray after baking.


4. Bake at 170°C for between 7 to 10 minutes till some parts are a light golden brown (this would give a much nicer, crispier texture).


5. Allow them to cool completely before transferring to an airtight container. I've decided not to store them in the fridge as there'll be condensation when I bring them out.

I also did a batch without using the whipped cream dispenser & it turned out to be easier though not necessarily faster. In fact, the smaller the balls, the better the texture.


BB has yet to try them as he's down with a slight fever & flu, probably gotten the virus from his Daddy-O who has just recovered >.< To my slight disappointment, the desired "melt-in-the-mouth" texture has still proven to be elusive after this attempt. Perhaps I could double the amount of baking powder during the next attempt to achieve a puffier feel. But for now, this will pretty much suffice as both a handy & healthy snack to keep him occupied at times..hee ;p

My 13M 20DO BB saying 'Book Book'!

My boy has been saying more words since his 1st birthday. Other than Papa & Mama which he had started calling for quite a while now, he said "mum mum" to ask for food while we were out having dinner last month. Recently, he also said "ber ber" when I was feeding him an apple. The latest word he said was "book book". Every single time that he learns something new, I feel a great sense of gratification & I'm pretty sure I'm not the only Mummy who feels this way ^.<

I guess one of the reasons why "book" is one of the first few words he has said is that I've cultivated a habit of reading to him since he was 1mo because I'm a firm believer that reading will benefit him in many ways, academically as well as non-academically. As he grew older & was able to sit on his own, he enjoyed playing with the books more than me reading to him. More often than not, he would snatch away the book as i was reading to him. Despite that, I never gave up & we even set up a mini reading corner for him when he was 8mo.


Fortunately, my efforts paid off finally. He can now sit through quietly as I read 3 to 6 books to him every morning. I hope that he'll continue to enjoy reading for many years to come.


Wednesday, 10 September 2014

Goodbaby High Chair & Fisher Price Healthy Care Booster Seat

As your baby's weaning approaches, most parents will start looking around for a suitable high chair & it was no exception for me. I'd more or less decided on adopting some BLW then so I knew I would need one which could be cleaned easily. Upon shopping around for a while, my choice went to Goodbaby bought from Kiddy Palace which set us back by more than a hundred bucks.

Its features are as follow:

- 3-position reclining backrest
- 6-position adjustable height
- Waterproof cushion
- 3-position adjustable & removable front tray
- 5-point harness
- Easy folding mechanism
- Self-standing when closed

Thus far, this chair has served us really well. The waterproof cushion makes it very easy for a wipe-down anytime. The 5-point harness combined with the adjustable front tray has prevented any 'escape' attempts from BB which seems to be a common problem for parents using the Ikea high chair. Last but not least, it is very sturdy & stable even at its highest height position. There's one slight disadvantage though - you can't wash the tray under running water as water gets trapped inside some compartments underneath it. Therefore, to prevent mould from developing, you can only clean it with a cloth. 
(Note: There's a similar one in orange / blue washable cushion so don't buy the wrong one.)


We also invested in another portable booster chair from Fisher Price which we always leave in the car. 

Its features are as follow:

- Adjustable feeding tray that can also be sanitised in the dishwasher
- 3-point harness
- Removable seat backing
- Smooth easy-wipe surfaces without crevices to trap crumbs
- Folds compactly for storage & easy portability

This booster chair is a God-send! We simply adore it. It can be attached to any chair with a backrest so dining outside is a breeze. Parents also don't have to fret over the cleanliness of high chairs anymore (one of the boys in my July 14 mummies' group actually contracted a virus & developed a rash after sitting in the high chair of a restaurant). Similarly like the Goodbaby, the 3-point harness & tray actually helps to prevent BB from climbing out. Furthermore, as he grows bigger (especially with his bulging tummy), the seat backing & tray can be removed & it'll simply add as a booster seat to add height to any chair.


If we had gotten this booster chair first, I might not have gotten the Goodbaby high chair. On the other hand, my hubby begs to differ. He's happy with having both concurrently ;)

Tuesday, 9 September 2014

The Good, The Bad & The Evil

I remember I used to marvel at the soup bases that mummies shared on the 'Healthy Food for My Baby' Facebook group when I was prepping myself for BB's weaning. So many ingredients were used in preparing the soup base & they would add in even more ingredients when they use it to cook porridge for their lil' ones. 'The porridges will definitely taste delicious!' was the thought that went through my head.

As I was following the 3/4 days rule for BB, it seemed to take forever to introduce new foods to him. Gradually, I was able to add in more ingredients to his porridge after he passed the respective allergy tests. Unfortunately, my parents weren't too supportive of it eventhough I was only using no more than 3 to 4 vegetables then. They were concerned that some of the combinations may bring more harm than good. Despite me explaining to them that a lot of mummies are doing the same or even more than me, they still weren't convinced. To put their mind at ease, I told them that I'd do more research on it. I then decided to look for a book shared by one of the mummies which shows foods with a list of other foods which when consume together, will either bring about some health benefits or harmfulness. To my dismay, it wasn't carried by Popular. While continuing my search for it, I chanced upon a similar book at a small book sale in Bedok Mall's FairPrice Finest so I bought it. 


After reading through the book, I realised that my parents were indeed right. For example, ABC soup, a very common soup cooked by mummies, usually contains carrots, corns, yellow onions & potatoes. However, carrots should not be eaten together with onions / corn & corn should not go with potatoes as illustrated in the following 2 pictures. I've since formed a habit of referring to this book before cooking any meals for BB. 


For mild cases, nutritional values are reduced or indigestion may develop. For examples,

Tomato + Zucchini = Reduce nutritional values

Beef + Rice = Indigestion

For more serious cases, diarrhoea or vomitting or even adverse health effects in the long run may be experienced or in worst cases, even poisoning! 

Prawn + Pumpkin / Kiwi + Milk (especially for mummies who eat overnight oats) = Diarrhoea

Chicken + Sesame = Possibility of poisoning if consume frequently

Without a doubt, the soup or soup bases will be very sweet & flavourful by adding more ingredients. However, in this context, more doesn't always necessarily mean better. On the contrary, some foods actually complement each other so do try to pair them up. For examples,

Chicken + Mango = Increase nutritional values

Apple + Corn / Cabbage + Carrot = Boost immune system

Cod + Pumpkin = Prevent flu

Lettuce + Pork = Energise 

Moving forward, I'll indicate at the bottom of each post the nutritional benefits, if any, for the dishes I've whipped up. I'll also add them on for those recipes that I've already posted previously. Cheers to healthy eating!

Avocados, Brain Food for BB!

In my "Weaning from 6MO" post, I've shared that avocado was the 1st food which I introduced to BB. Like many 1st time mummies, I was at a total lost when it came to choosing a ripe avocado. I remembered buying 1 for myself when I was pregnant, and not knowing for certain if it was as yet ripe, I ate it. It was hard & tasted kinda funky. Never did I buy it again during the rest of my pregnancy. I actually had to do some homework before I went to buy them for BB subsequently.

Tips in choosing the right avocado:

- If you want to use soon, it must be entirely brown in colour. When squeezed lightly, it should feel slightly soft but yet firm. If it's too soft, it'd most likely mean that it's already over-ripe. It's best to keep it refrigerated & consumed ASAP.

- If you'd like to store more for later consumption (especially when there's a promotion on heehee), choose firm greenish-brown ones & leave them on a table or counter-top at room temperature until they are almost brown before transferring them into your fridge.

- Do not remove the stalk until you are ready to eat it. I've learnt this the hard way once when after the stalk dropped out during handling, I discovered mould growing from the exposed part when I checked on it subsequently as I was preparing to eat it.


BB used to love avocados but as he grew older & was exposed to an expanding variety of foods and flavours, he became more picky & started rejecting it. I guess he probably found it too tasteless compared to his new discoveries. Given the fact that avocados contain a lot of good fats for his lil' brain's development, I tried to prepare different variations of it for him. Here are some of them..enjoy!
(Note: all of the combinations are for BBs 8MO & above other than the pure bananacado & provided they've passed the 3 or 4 days rule for the respective foods)

Bananacado: blend (I used my Avent Combined Steamer & Blender/ mash the flesh of 1 ripe avocado with 1 ripe banana & serve immediately.

This is omzg GOOOOOOOD!!! The very 1st time BB cried for more food was for this..lolz! If you haven't tried this before, please go & buy the ingredients & try it yourself today. I guarantee you won't regret it! ~.^


Bananacado with raw wheat germsimilar to the method above except with the addition of some wheat germ to further enhance the nutritional values. To give you a heads up, the natural taste of wheat germ is one that is not readily acquired. Think along the lines of having a mouthful of raw flour. Luckily, BB finds it palatable *phew*


Bananacado with a kampong egg yolk: similar to the method above, with the addition of a steamed egg yolk.

I was trying out the recipe of avocado with egg yolk purée but to my dismay, it was too bland for him so I improvised & mashed in a banana for him.


Baked avocado with a kampong egg yolk

1. Pre-heat oven at 220°C.

2. Halve an avocado, remove its pit & put them on some aluminium foil to balance it and prevent it from toppling over (this means no washing up afterwards too).

3. Separate 1 egg yolk from its white & pour it into the hollow of one half of the avocado. Repeat for the other half. 

4. Bake for about 15 to 20 minutes till egg yolk is fully cooked. Scoop out, mix & feed warm.

Personally, I don't quite fancy the taste of this but both Daddy-O & BB find it acceptable. And as long as he takes to it, I'm not complaining.


Avocado, cream cheese with wheat germ balls (adapted from original recipe): blend / mash the flesh of an avocado with some cream cheese (I use Philadelphia block cream cheese). Once you achieve a semi-smooth mixture, add some wheat germ & roll into small balls.

Anything with wheat germ is just not my cup of tea but BB ate quite a few of them. I think I'll try spreading it on toast next time but without the wheat germ..heehee ; P


Avocado with cottage cheese: scoop out the flesh of an avocado & mix with some cottage cheese (I'm using Mundella's which is preservative free).